There’s something elegant & inviting about a wooden box with hinges & a clasp … more so if it invites you to create!
If you’re looking for a low cost but mechanically sweet pochade box for those spontaneous paint outs, this design is gonna flip your lid. I know … corny pun. But really! I have been looking at a lot of DIY pochade box conversions out there and nothing comes close to the functionality and aesthetic here. And it’s easy! Glue, nails, scrap wood and a few good hand tools will have you out painting in a few hours. … especially on a cold, rainy winter day when you are dreaming about a spring plein air painting in Morocco!
Basic Ingredients
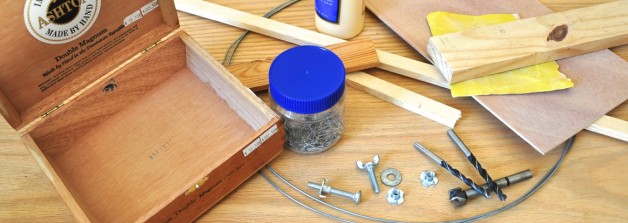
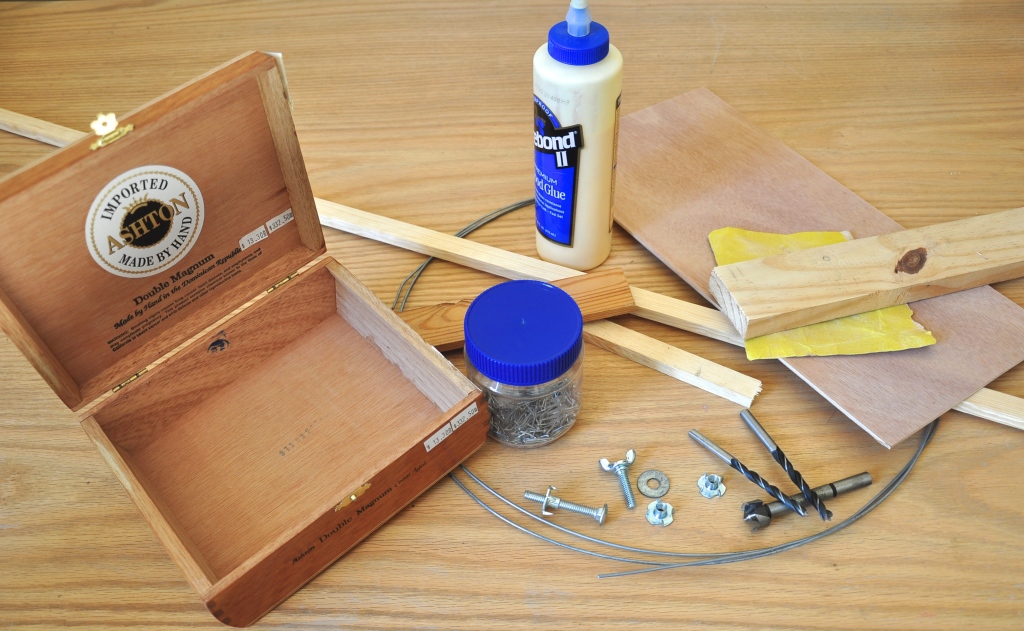
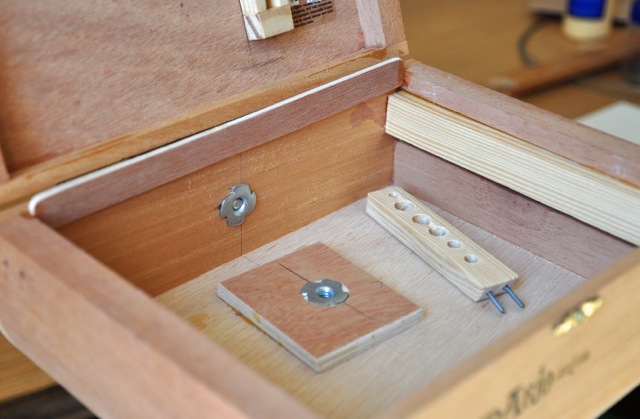
As you can see here in the picture, the ingredients are simple. I am not going to list dimensions here, because they’ll depend on the box you find and what scrap wood you start with. Once you understand the design, you can scrounge for the wood with wisdom about what you are hunting for. You’ll need some thin plywood or luan as well as some narrow lath-like pieces and other scraps. A key hardware acquisition for this project is the T-nut (3 total). If you use 1/4” #20 ‘course’ thread it will match the typical tripod bolt mount. One matching carriage bolt and one wing-bolt of the same thread count. Some clothes hanger wire, small brads/nails and wood glue.
Tools
Altering small pieces of wood with a miter saw or coping saw is not as difficult as it is with larger pieces, so modify the scrap wood as needed. Used a hack saw to cut the bolts to size. A utility knife and straightedge come in handy too for cutting thin plywood using only a slight pressure but many passes to cut through the layers. You’ll need clamps, sandpaper, a hammer and hand drill (I used a drill press but it can be done without one) and a small selection of bits to match the T-nut dimensions. I used a 9/32” for the T-nut shaft and 1/4” for the bolts. I also used a couple of Forstner bits to cut both the thumb hole in the palette and the 3/4” T-nut sink in the knob and lid-stop.
The Box
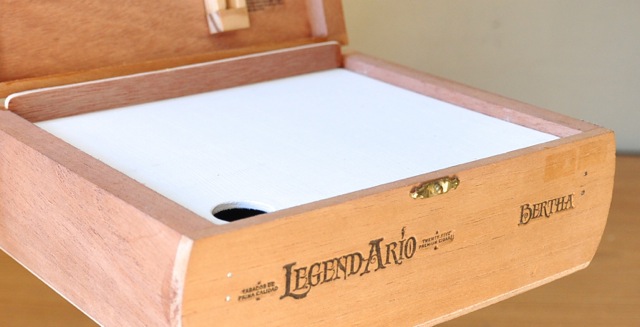
It all starts with the right cigar box. Not the cardboard ones with a paper hinge … Though they’ll work for a short time. Ask for a nice wood cigar box anywhere they sell smokes. The two that I bought for about $5 each have rounded sides, but I have seen them with straight sides as well, and they might be easier to alter. This one is cedar and it reminds you every time you open it. I like the rounded sides for hand holding it. The main criteria is that it feel solid.
Hinges
Make sure it closes nicely and has reasonably good hinges. If not, you may have to spring for some tiny brass hinges and replace the “stapled-in” variety that are often used. I went to replace the hinges, and had so much trouble getting one out that I decided they were strong enough and certainly tenacious enough to endure.
Lid Stop
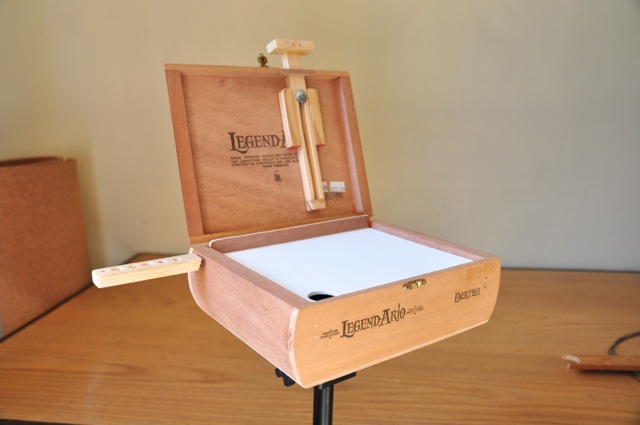
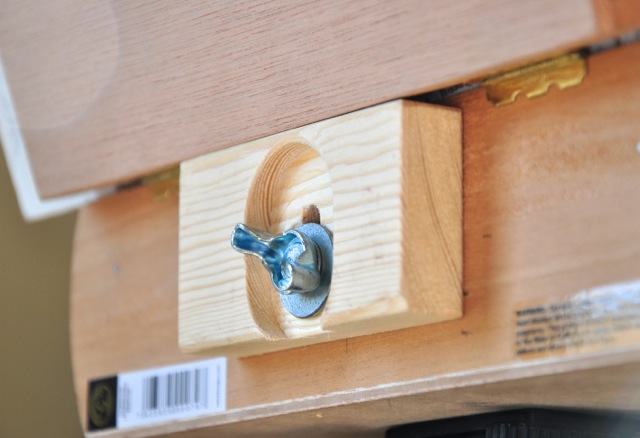
Next you will need something to support the lid from opening too far and in fact to hold it strongly as you paint. You have a couple choices here. You could just glue a small block of wood against the back of the box, in “just the right spot” according to you, to stop the lid where you want it. Or you might try what I did here and make it slightly adjustable so that you can change it for when you are hand holding the pochade or want to change the angle for another reason. I made it adjustable by drilling two holes and then using a coping saw to connect the holes, making a 1/2″ slide channel in the block. I also cut a sunken area for the wing bolt using a larger Forstner bit. A washer helps to apply the pressure of the wing bolt. I chamfered the edges with sandpaper to make it more friendly to handle.
The Mount
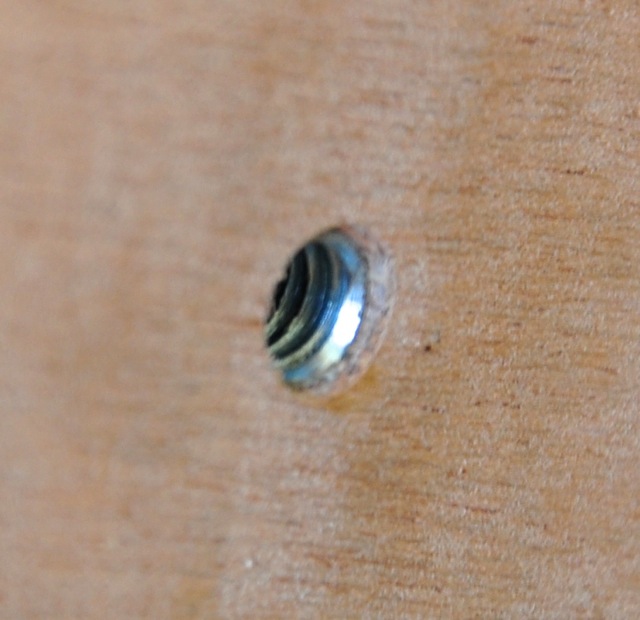
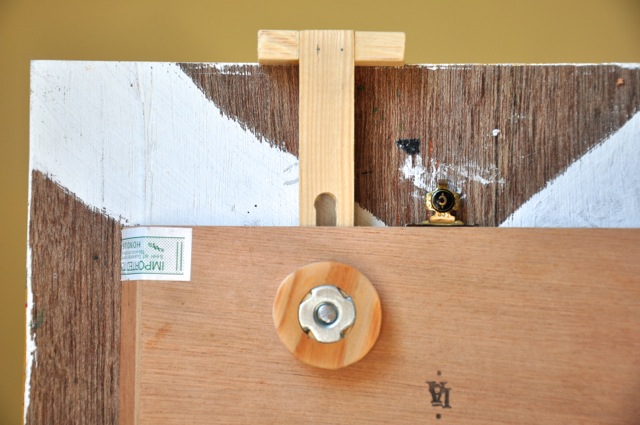
I reinforced the bottom of the box with a square of plywood (it accidentally dried askew during clamping when I couldn’t see it! … Character, right?) Once the glue dried, I drilled (9/32”) for the 1/4″ #20 T-nut shaft slightly back from center so that on a tripod it would sit forward more. I flipped the box upright and slowly pressed the T-nut in using a piece of scrap 2×3, and then also with a light tap of the hammer. A hard whack of the hammer could cause the T-nut to split the wood. I use a removable tripod head that I can leave on the pochade so I can pull it out of my bag and snap it to the tripod.
The Palette
I used a utility knife, rather than a saw, with a fresh blade to cut the palette panel exactly so it would fit snuggly in the box. Drill a thumb-sized hole in one corner to access the storage bin and allow you to hand-hold the palette while painting, if you prefer. Sand the edges and surface slightly to soften and perfect the fit. Some people prefer to varnish the palette and some prefer to gesso it. I used two coats of acrylic gesso and sanded the final so it is palette smooth.
The Paint Storage Bin
Here, you will need to exercise some creativity depending on the shape of your cigar box and the scrap wood available to you. The sky is the limit, though. You could set either vertical or horizontal palette brackets with wood, wine corks, tubing, dowels, anything! I used strips of narrow wood glued along the length and double-nailed at the ends because the box walls were curved inside. Simple.
The Easel
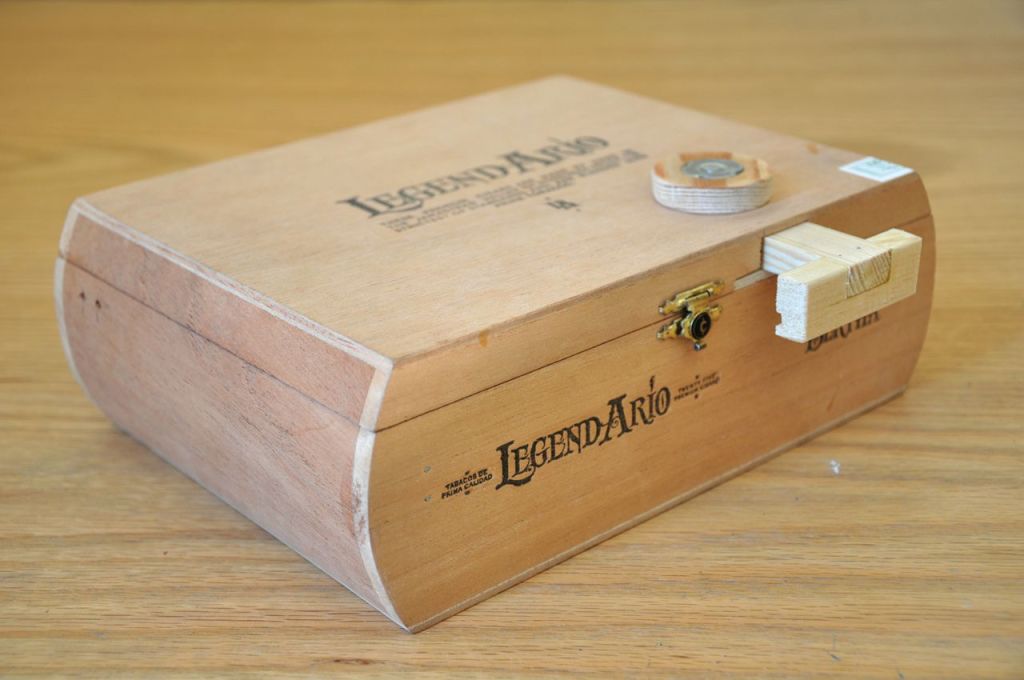
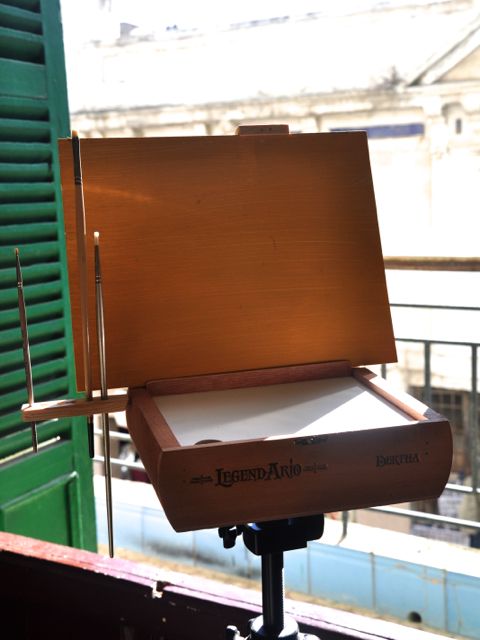
Perhaps the most complicated looking piece, the easel is really the sweet spot of this design. Nothing quite like a functioning wooden knob! For a DIY pochade box, though, it is actually rather simple. I used a hand saw and drill for the whole thing. The “mast” or riser bar of the easel sticks out a little when the box is closed, but if that’s a problem, just unscrew the knob and stow the mast in the storage bin.
First glue a narrow strip of luan inside the edge of the back wall to function as both the bottom lip of the easel and a wall against which you can lay out paints on the palette (this should allow the lid to slide under it easily but snuggly). This strip should sit lightly atop the palette but not be glued to it! The rough steps for building the rest of the easel look like this:
- Decide on the wood you will use for the mast of the easel – this one is 3/8″ x 3/4″ pine.
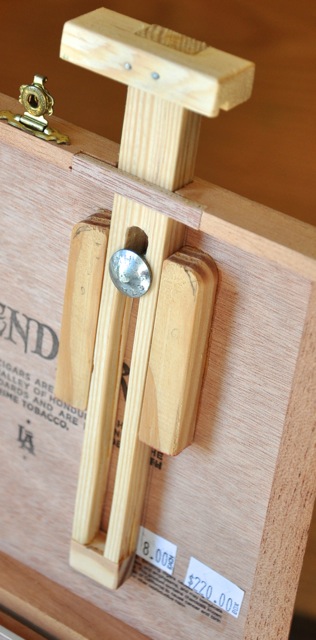
- Cut an opening in the front lid wall all the way to the lid itself, to match the easel mast width
- Cut a recessed area on either side of this opening to accept a ‘cover’ piece after all is assembled
- Estimate the length of the mast needed. (when fully lowered, you should still be able to close the box) – this one is 7 1/8″ long including the end cap. It accommodates a 12″ high panel of any width.
- Carefully layout the bolt channel up the center of the mast. This should be of a dimension that allows the carriage bolt’s “square peg” to slide easily.
- Cut the channel from one end to the point you have marked where you want the bolt to stop the mast from sliding (I found it helpful to actually drill that end point first).
- After you have sanded this channel, cut a small piece of wood to the dimensions of the mast and drill holes in the end (I used a brad with the head clipped off as the drill bit) and glue and nail this ‘cap’ to the end of the channel. Sand any overage so it is consistent.
- Mark a hole for the bolt and drill (1/4”). I installed my easel mechanics to one side of the closure just so I could keep the original closure. At this scale, it does not affect the easel’s ability to secure a panel in any way.
- Using a compass or a cup, draw a small circle, or any shape, really, (about 1 1/2” diameter) on a 1/2” piece of scrap wood and then using a Forstner bit, cut a recessed area to receive the T-nut head. Next drill the 9/32” shaft hole and carefully press the T-nut into place (you can put a dot of super glue in there too). Once the T-nut is set, use a coping saw to cut out the knob itself … it does not really have to be perfectly round.
- Assemble the mast and knob with a bolt and mark the bolt for cutting with a hack saw.
- With the mast tightened in a perpendicular position inside the lid of the box, glue two narrow guide blocks in place, being careful not to apply too much glue that could squeeze out into the riser bar area and lock it in place accidentally. Clamp these to dry and remove the riser bar.
- Finish the top of the easel mast with a grooved piece of wood to hold the top of a panel. This should be fastened well with both glue and nails because the stress is greatest on this joint.
NOTE: You won’t need any hardware to lock the lid in the open position, because the triangle formed by the painting panel against the easel, lower lip and hinge point will actually function to hold the lid open. Basic geometry in action!
BONUS – The Brush Holder
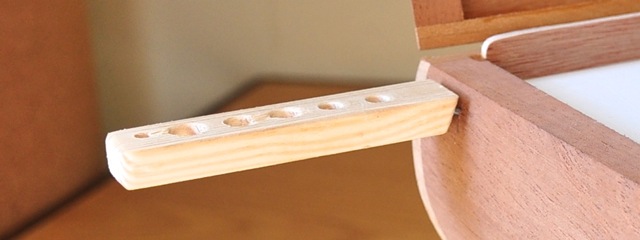
This little USB-style add-on is simply a strip of leftover wood with several different size holes drilled in it and then 2 short lengths of clothes hanger wire in the end. Drill the end holes for the wire at two different angles (for example, in towards each other like a triangle) so that when you glue them in, the angle helps keep them from pulling out. Drill matching pin-holes in the box side close to the hinge side so that when you hand hold the box to sketch, it is not in the way. Store in the bin for travel.

[…] in luck, because cigar boxes will still be a useful crafting tool for you! We love the way Green Olive Arts turned their cigar box into a travel sized pochade by adding a stand on the bottom and a flat shelf […]
Excellent thanks I will adapt to my design
Beautiful box! And I like the way your panel holder is integrated. One question, what is the palette made of? Thanks!
Thanks! The palette is just a primed panel of wood…